Sean B - Roof collector!
Looking great Sean. It gets hard to know when to stop doesn’t it.
Sean B - Roof collector!
Looking great Sean. It gets hard to know when to stop doesn’t it.
LOL, yeah I know what you mean Ian. But I have also included a big red light in the dash binacle and all of the external warnings from the SPA’s go to it, so there will be no need to look at the SPA’s until the big red light comes on then a glance left to see which SPA warning light is on and bobs your uncle.
The blue and red buttons in the centre of the car are the ignition master cut off switch and the extinguisher.
The top two switches to the right of the steering wheel control the stack rev counter and below those is the fuel pump switch and the big red starter button.
I have to say though that I am looking into one of these “all in one” dash displays. As soon as I have confirmed that the one I want can take a gear position signal from my Quaife box, i will probably go for one of those. It also takes 8 analogue inputs, so there will be no need for any of the SPA’s or the fuel level gauge once that is in. But that will be part of phase two.
That is if i ever finish with phase 1.
Sean…
Sean, you’re an inspiration for all us to follow.
(secretly hopes not )
come on Sean stop taking all the glory!
We all know you got Angle Grinder Man in to do it
[image]http://www.lesjones.com/www/images/agm.gif[/image]
Had a good day on the car today, or all just seemed to come together. Finally got the dash binnacle finished and fitted. Sorry the pics aren�t great but it was dark and the dash lights are bright so the pic didn�t come out great.
[image]http://img.photobucket.com/albums/0903/SeanBicknell/DashBinnacle-noflash.jpg[/image]
[image]http://img.photobucket.com/albums/0903/SeanBicknell/wholedash.jpg[/image]
Then we actually fitted the roof properly and the rear clam and engine cover. All of these had just been resting in place until now. Took a while to get the panel gaps right. There not perfect, but then it aint some concourse bufty wagon.
Got all of the new water system piped up as well. I know it looks a bit of a mess, but I didn�t want to buy new hose until I had it all fitted up and working. Once its all proved I will be getting some hoses made so that everything matches and there aren�t loads of joins every where.
[image]http://img.photobucket.com/albums/0903/SeanBicknell/headertankfittedandpiped.jpg[/image]
New QED thermostat in place
[image]http://img.photobucket.com/albums/0903/SeanBicknell/QEDremotestatfitted.jpg[/image]
Rad back in with new fitting welded on for the bleed return to the header tank
[image]http://img.photobucket.com/albums/0903/SeanBicknell/BleedpipefromRad.jpg[/image]
Then put the exhaust back on
[image]http://img.photobucket.com/albums/0903/SeanBicknell/Exhauston.jpg[/image]
Then the car ran properly for the first time in god knows how long. We ran it for about an hour, everything ran well actually, the water system was great, there were no air locks at all and the system bleeds itself as it is running, which was the general idea. Nothing got to hot, or was to cold. I was pretty chuffed actually!!
Also as I am not going to run front wheel arch liners (none of the race boys seem to) I made some stone guards for the front bulkhead
[image]http://img.photobucket.com/albums/0903/SeanBicknell/Stoneguards.jpg[/image]
They are just cut from rally mud flap material and should do the job pretty well.
Other jobs that got done today were:
Wiper motor back in
New gearbox oil cooler return pipe, as I decided the original one was a tad too short and might get in the way
New wheel stud fitted to one of the rear hubs as the original had got bent
I also spent a some time on the phone with the pro shift guys. Neither I nor them could believe that the control box had packed up. I had double and triple checked my wiring and everything was as it should be. In the end I took the control box out and simply joined the live and earth wires directly to another battery and still the thing didn�t fire up. This drew a line under the fact that the box is faulty. God knows how that happened, it worked fine before I took the car apart and it has simply sat on a shelf between now and then.
I am taking the car up to them on Monday for them to fit a new control box, so fingers crossed that will sort it once and for all. I have to say though I am a little perplexed how this thing could have lunched itself. I am considering putting the gear lever back in as well, just in case it packs up again, while I am driving it.
They said they had a test bed, that will tell us exactly what is wrong with it, so I will reserve judgement until we find the answer to that one.
Awesome work Sean - this is going to be really special when it’s done.
looks sooo good sean,
alomsot there, bet ya getting excited now
the radiator bleed sytem you got, would this work just as good on my car?
as i’m about to fit a alloy rad to mine, and wondering if is should do the same mod
the radiator bleed sytem you got, would this work just as good on my car?
as i’m about to fit a alloy rad to mine, and wondering if is should do the same mod
I was thinking about this myself, and wondering why Sean had actually done it. Is it only useful if you are going to be dropping your coolant very frequently, as if the system is bled correctly then air can only get in if there is a problem.
Also, with regard to the take off point it, if it then loops down to the sill before raising up to the header tank, can’t the air just stay trapped in the highest part of the loop?
Sean
This looks superb… your dash is excellent and the new roof with the vent is pretty cool as well.
Is your windscreen a plastic one from Plans ??.. you prolly already told us but i’m too lazy to go back thru’ searching.
Also… can you measure radius of radiator fan b4 front clam goes on pleezee… pretty pleeze… i know i sid i’d phone, but i’m crap at remembering things.
cheers
Sean, do the bulkhead stone guards block the vent at the back of the clam? It’d have thought that was useful for drawing heat through the wheel bay?
Ian
Ian - they are dummy vents aren’t they?
Not if you open them up, which I’ve seen done. I think it may just be the liner that blocks them. Means water from puddles comes through, not such a good look for the street (especially on the white car I saw it done to!).
Ian
Thanks for all of the comments guys.
OK to try and answer the questions.
Spiky & Steve. I first saw this bleed tube running from the radiator to the header tank on Sam Bloggs car at Oulton last year and I started asking questions then. Evidently the Autobytel cars used them as well. I do agree with what you are saying Steve, but I do like the idea of any air in the radiator having somewhere to go rather than staying in the rad. I agree with what you are saying about the air staying in the pipe, but that is cool with me, the pipe after all isn’t part of the cooling system, it is simply a bleed pipe back to the header tank. So IMO yes Spiky it is a good thing to do, but maybe overkill on a road car. My mind was made up after chatting to John at Plans and he reckoned it was a good idea and that was good enough for me.
Rox, yes it is a plastic one from plans. DOH!!! yes I will endeavour to try and remember to measure the rad fan tomorrow. Tell you what text me early afternoon tomorrow and I will do it there and then. 07967 662294
Ian, No the stone guards don’t block the air vents in the back of the wings, they simply follow the contour of the bulkhead
Steve, Yes they are dummy vents, but like Ian says they can be opened up. I opened mine up mid last year when I started to run with cut back wheel arch liners. I’m not going to run wheel arch liners at all this year
No pictures today I’m affraid. Did a hundred and one little finishing jobs today, all of which seemed to take longer than I had imagined. However I am still pretty confident about being totally finished by tomorrow night, with the car loaded on the trailer and ready to go to Pro Shift on Monday!!
Sean…
All looking very, very neat Sean. Nice work.
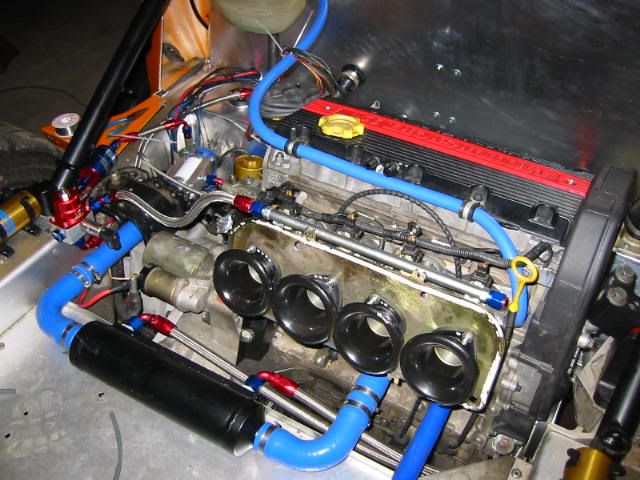
Are you sure you are happy with the lack fuel rail return pipe ? I can see how the circuitry will work but manufacturers are not in the habit of putting extra piping in if it’s not needed. All production cars I’ve seen have fuel rail returns. Just don’t want you to run into fuel vaporisation problems.
Bernard
I think that the only problem with this configuration is that the fuel might get hot, as it will be standing on the fuel rail.
When I was in Japan I saw a couple of cars that had blanked off one end of the fuel rail, making it look like there is no return. I think it looked really cool, plus it saves on about a four foot piece of -6 aeroquip pipe, so I went for that setup on my car. A prize to the first person that figures out how it all works. Lol.
[image]> http://img.photobucket.com/albums/0903/SeanBicknell/Newfuelrail.jpg> [/image]
did anyone get the answer to this one?
Thanks for you comments Bernard. I understand where you are coming from and I had these concerns and questions when I spoke to the Japanese guys. The three cars (I think it was three) were S2000 drift cars, and there entire fuel system was in the boot. Fuel cell, pumps, regulator, return, everything. They only had one fuel pipe that left the boot and that travelled all the way through the car and to the rail. They said thay had measured the temperature of the fuel at the blanked off end of the rail and it wasn’t getting that much hotter. I was a little sceptical myself, but these guys had ran for several seasons without an issue, so I guess we will see. I do have the old return pipe that I can throw on to take it back to a conventional arangement if I do have a problem.
I guess I did it because it was different and it looked cool. lol
The car ran at a stand still for an hour or so the other day and simply using my hand on the return pipe from the bottom of the reg and then putting my hand on the end of the rail, there didn’t seem to be any difference in temperature. I will of course take a few more scientific measurements in due course.
For those that haven’t worked out how the system works, firstly, there has to be a return to the tank and I do have a return that comes out of the bottom of the fuel pressure regulator and goes back to the tank. But basically the fuel leaves the pump, passes through the filter and travels to a “T” piece. One branch of the T goes to the rail, the other goes to the regulator, so the regulator is pressureising everything from the pump all through the filter and along the rail and excess fuel escapes through the reg (once up to pressure) and back down the return. The only way the fuel gets out of the fuel rail is through an injector and into the engine.
I hope that explains it. lol.
Sean…
IT�S FINISHED!!!
LOL
Well as finished as it can be at the moment. It is now all back together and loaded on the trailer ready to go to the gear box place tomorrow. It is bloody filthy, but I have only just finished, so it will have to wait for its trip to Derby to get washed by the rain.
It also looks like one of those dodgy VW Polo Harlequin cars, with its white roof, black engine cover, rubbed down and filled rear clam and silver front sill cover things.
Fingers crossed it will get painted on the 22nd.
[image]http://img.photobucket.com/albums/0903/SeanBicknell/unpainted-frontleft.jpg[/image]
[image]http://img.photobucket.com/albums/0903/SeanBicknell/unpaintedrearleft.jpg[/image]
Just in case anybody wonders, I left the rear undertray and diffuser off as we will probably need access to the gearbox and stuff tomorrow.
Sean…
Looking great sean, bet you are so happy you are nearly at the end with it now and can go and enjoy it! Are you fitting any sort of rear wing? or will this be left of for dowforce issues?
![http://www.lesjones.com/www/images/agm.gif[/image]](http://www.lesjones.com/www/images/agm.gif%5B/image%5D)
![http://img.photobucket.com/albums/0903/SeanBicknell/DashBinnacle-noflash.jpg[/image]](http://img.photobucket.com/albums/0903/SeanBicknell/DashBinnacle-noflash.jpg%5B/image%5D)
![http://img.photobucket.com/albums/0903/SeanBicknell/wholedash.jpg[/image]](http://img.photobucket.com/albums/0903/SeanBicknell/wholedash.jpg%5B/image%5D)
![http://img.photobucket.com/albums/0903/SeanBicknell/headertankfittedandpiped.jpg[/image]](http://img.photobucket.com/albums/0903/SeanBicknell/headertankfittedandpiped.jpg%5B/image%5D)
![http://img.photobucket.com/albums/0903/SeanBicknell/QEDremotestatfitted.jpg[/image]](http://img.photobucket.com/albums/0903/SeanBicknell/QEDremotestatfitted.jpg%5B/image%5D)
![http://img.photobucket.com/albums/0903/SeanBicknell/BleedpipefromRad.jpg[/image]](http://img.photobucket.com/albums/0903/SeanBicknell/BleedpipefromRad.jpg%5B/image%5D)
![http://img.photobucket.com/albums/0903/SeanBicknell/Exhauston.jpg[/image]](http://img.photobucket.com/albums/0903/SeanBicknell/Exhauston.jpg%5B/image%5D)
![http://img.photobucket.com/albums/0903/SeanBicknell/Stoneguards.jpg[/image]](http://img.photobucket.com/albums/0903/SeanBicknell/Stoneguards.jpg%5B/image%5D)
![http://img.photobucket.com/albums/0903/SeanBicknell/unpainted-frontleft.jpg[/image]](http://img.photobucket.com/albums/0903/SeanBicknell/unpainted-frontleft.jpg%5B/image%5D)
![http://img.photobucket.com/albums/0903/SeanBicknell/unpaintedrearleft.jpg[/image]](http://img.photobucket.com/albums/0903/SeanBicknell/unpaintedrearleft.jpg%5B/image%5D)