Our grandson wants to go into the garage as soon as he gets here and there can be tears when trying to get him out.
Your Exige looks great Klaus ![]()
Our grandson wants to go into the garage as soon as he gets here and there can be tears when trying to get him out.
Your Exige looks great Klaus ![]()
Great shot, he looks really seriously involved ![]()
Love it ![]()
My eldest is the same,…weird ain’t it!
mine is the same, “daddy is your lotus quicker than that car”
“well jack, techincally yes, but not while its still in a thousand peices”
“ohhhh”
The car has finally seen the road again!
Using a short term registration I was able to do my first test drive in the car.
To my surprise things worked surprisingly well. The rescue team (my wife and my eldest son) following me in our VW Transporter equipped with a full mobile workshop was not needed at the end. At least the car did not break down by loosing all its coolant or setting itself on fire.
Driving my car for the first time felt great. The gear change is slick, the suspension is surprisingly forgiving and no Yikes to hear at all from the LSS Koni dampers. Very smooth.
The car came equipped with a yellow Titan quick rack and I’m very pleased how much the steering feel is improved by this rack. A lot better than in my Elise with standard ratio rack. The steering wheel is centred dead straight which is always the prove that a suspension set-up has at least set the thrust line properly (rear axle points along the centreline of the car).
The car is equipped with a fat 2bular exhaust plus catalytic converter and as a result the exhaust note is very modest which I like. I bought a Janspeed SuperSport from Marten just in case I need some more noise one day ![]() . And then there is the sound of the idling VHPD engine. I could listen to it for ever.
. And then there is the sound of the idling VHPD engine. I could listen to it for ever.
Next step before being able to register the car was to pass a technical examination at the TÜV (something like MOT). I can tell that the car has already passed it but it was tricky.
Absolutely brilliant Klaus, that’s a great effort mate well done.
Klaus,
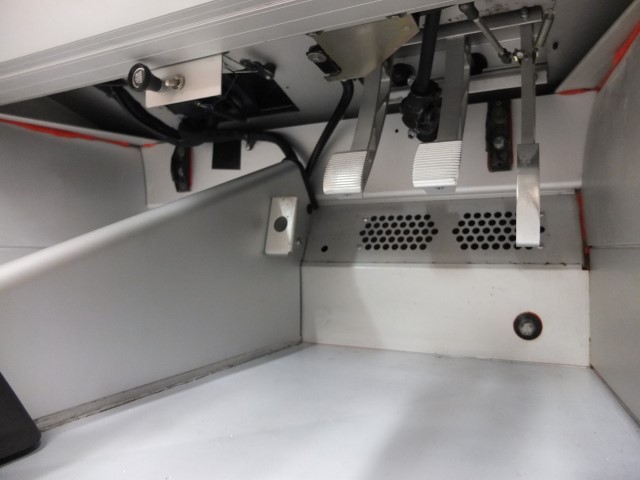
You need an important modification, some sticky tape over the holes in front of the pedals and the same on the passenger side, otherwise you will have cold toes in winter. I used deck tape from a skateboard and put some on the accelerator pedal as well, nice and grippy and looks like it is supposed to be there.
Look great. Enjoy it.
Keith
Hi Keith,
if you mean the holes that are shown in the picture below I’ve already closed them. I cut some black ABS plastic to size and riveted it in place from the outside. I think I sealed it too.

By the way, I still have some problems with the connections of the IACV hoses to the manifold on its underside. I used some M14 screw in hose connector but on the left side there is so little space between the manifold and the two coolant return pipes. I managed to get the hose on to the connector but it is not ideal.
Does anyone have a picture that shows how the hose is connected to the manifold? Does it run between the big and the small coolant return pipe?
Great work. It looks fabulous.
Nice job matey. Great looking car!
Thanks for all the kind comments ![]()
In order to register a car in Germany you need to pass a technical examination called TÜV (just like the MOT).
First problem at the MOT station was to get the car onto a lift. To my surprise the workshop had no drive on lift but only the ones using four lift arms.
We had a hard time trying to get the arms under the car until I decided to remove the diffuser to get access to the lifting points at the subframe.
Second and bigger problem was the validation of the technical data. At this stage there are no papers with the cars except the COC paper which I have bought from Lotus. This paper is the golden key to register a car here in Germany. Without a COC it could be very very difficult to register it.
The engineer at the MOT station was very friendly and as the car is in a good technical state there was no real problem. Until the moment he checked the tyres and realized that the front tyres where of the wrong size. Of course the car is wearing the correct 195/50 16 front tyres but in the COC paper the size was given with 195/55 16! I told him the COC paper is wrong here but he wasn’t impressed.
Being eager to help with the problem the engineer was able to download the full 30 page ‘EC Type Approval Certificate e498/140008*15’ paper from some non-public government site. And there the tyre size was given with correct size of 195/50 16. Bingo.
So Lotus managed to mess up the all important COC paper of at least my Exige ![]()
So my car passed the examination without any faults and the engineer added a comment for the registration council to use the correct tyre size in the final registration document.
When registering the car last week I took all the papers with me but it didn’t help. The lady at the registration council was not convinced and refused to use any other tyre size than the one given in the COC paper. So I need to contact Lotus to give me a new COC (unlikely) or some paper explaining their mistake.
At least the car has been registered which is a very very important step for me. With such an exotic car like the Exige S1 you’re never sure that everything will work out until it is actually registered.
As mentioned in my ‘drivability’ thread the clutch system leaked at the slave cylinder. I discovered that it wasn’t the slave cylinder that was leaking but the last part of the clutch line. The rigid steel line has cracked just below the flare that is screwed into the slave cylinder.
It is a very special piece of a short rigid lining with one hollow screw of size M12x1.0 at the slave cylinder side and the other end of size 7/16 UNF 20 at the braided lining end (which is of size AN-4, teflon lined). Instead of fixing it in the original way I decided to switch to a banjo bolt/hollow screw solution just like the replacement lines sold by some suppliers.
As I had also trouble tightening the same flared screw at the clutch master cylinder I did replace that one too. I just cut the braided line using an angle grinder and fitted an AN-4 terminal.
Browsing through some older exiges.com threads I found a guide of how to fit gas struts to the rear hood. Due to the photobucket suicide most of the picture were lost.
Anyway I found enough inspiration to choose two VariLift VL-6-150-400 gas struts (349mm length, 150mm throw, M6). I fitted them to the upper end of the finisher panel
using a stainless steel bracket. The hood end of the strut has been fixed using a M6 ball stud.
I reduced the pressure until both struts needed ca. 10kg/100N of force (measured on a scale to balance both sides).
Now when I release the hood using the lever in the door opening the hood opens just one or two centimetres but stays nearly closed. With a gentle lift it opens smoothly until it stops fully open. Very nice and as it should have been right from the beginning.
very neat. just taken mine off . . .
They look heavy…
![]()
![]()
![]()
![]()
![]()
![]()
![]()
![]()
![]()
![]()
![]()
It’s a high quality but otherwise ordinary black velour carpet. Nothing special. I cut it to size using a scissor and that’s all about it.
If you can’t find similar stuff this is the actual product I used: Vorwerk Modena, ‘night black’:
[u]https://vorwerk-flooring.co.uk/uk/textile_bodenbelaege/teppichboden_objekt_filter/kollektionen_teppichboden/fascination/modena2016.opl[/u]
Bye, Klaus
Thanks buddy
I’m driving the car on small trips (not too far away from my workshop ![]() ) whenever the weather is fine. This helps to sort some minor issues.
) whenever the weather is fine. This helps to sort some minor issues.
On one occasion the car just didn’t start at all. There was no fuel smell but the fuel pump was priming. I suspect it must have been a faulty crank sensor or at least it wasn’t giving a signal. The sensor had been replaced before with a new one and now I did remember that the old one was bent in a specific way.
I switched back to use the old sensor again and had no problem so far. It could be that the gap between the flywheel and the inductive working sensor is too big and that’s the reason why the sensor has been bent by a previous owner to reduce the gap. Did anybody encounter similar problems with the crank position sensor?
Although the Odyssey PC680 battery does a great job starting the car even on cold temperatures it was not able to crank the engine for more than one or two minutes.
When trying to connect the jump start clamps I had problems to place the clamp on the isolator switch terminals. There just wasn’t enough room in the crowded front compartment.
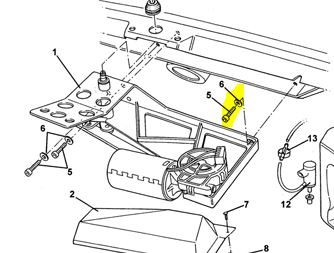
I decided to relocate the switch to a better place on the RH wheel arch liner. Of course the thick positive leaded needed to be replace with a longer one. There is a two post connector box tucked away in the unreachable, dead zone area behind the dashboard where the new lead had to be connected. To reach it I had to dismount the wiper engine which is fixed with must be the most awkward to reach screw on the whole car. It took a full two hours to get it back on.
Picture shows the f****ing screw:

The relocated main switch on the wheel arch liner: