Great write up and videos! Sounds like you had a great day. I’ve got massive track day envy ![]()
Tracked down the white V6 from one of my videos and he happened to have a couple of laps of me from behind (oooh err). Nice to see the car from this angle for a change!
Blue Exige - YouTube
Whipped the OSF wheel off tonight to check for arch liner damage, my roof tape has taken some scuffing but not enough to break through and show daylight through - so that’s a bit of a result. I think Blyton is a bit heavier on the OSF in terms of compression just because the turns are a little less flowing/high speed and a bit more “stomp on the brakes and chuck it in”. Will have to see how it fares next time I’m out there… which is this Saturday!
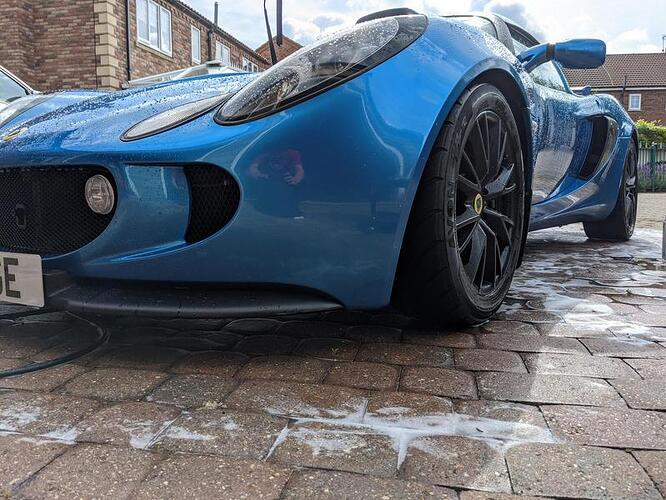
Car has been cleaned, tyre pressures back up to 30psi cold all around and done a quick pad/fluid check - splash of oil and we’re hopefully ready for another day of fun.
Nice bit of footage. Didn’t seem to have the legs on you, though! Well done ![]()
Both you and Oli in the other blue S2 Exige looked rapid from trackside - like the sort of speed where you notice a car punching above its perceivable weight . The Azure Blue S1 was tramming on, too.
Thoroughly enjoyed being there as Ishy’s helper and took about 500 shots. Lens upgrade req’d! ![]()
Enjoyed the write up and videos - looked quite smooth through the twisties. ![]()
The V6 didn’t disappear into the distance and only appeared to stretch out its lead on the straight.
BLYTON UPDATE:
Finally a good weather forecast for a trackday! Car didn’t get much attention since Croft, just a wash and a quick fluid/brake check.
Getting to the track was annoying, 2 miles from the entrance we had a road closure due to a railroad crossing issue so needed a 25minute diversion. grrr! Still arrived well and finally got to meet our very own andybond.
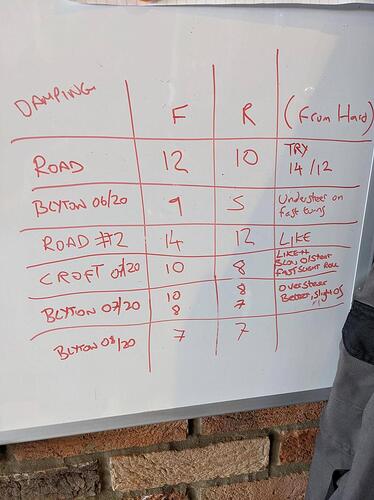
I left the dampers in their ‘Croft’ settings of 10F/8R (from hard) as the car felt really well balanced at Croft - allowed me to push on in faster stuff with a safe feeling car beneath me, with the slight tradeoff of poor traction in the hairpin.
As soon as we did the sighting laps it was clear that I was piling on tyre pressure quicker than Croft. At Croft I was only dropping 1 or 2 PSI per session to keep them in the zone but in two consecutive sessions at Blyton I dropped a total of 11PSI to maintain my 30psi reference!
In the morning the front end of my car felt brilliant, seemed like it would do anything I asked of it but the rear was not quite so enthusiastic. The 90 left of Bishops was particularly lairy, even with moderate throttle through the turn the back was kicking out. I even had oversteer whilst accelerating through Lancaster, this is a corner that will extract understeer out of any car on the planet so to have the back squirming a bit round there was an eye opener!
At this point I should probably admit my rear tyres are done, they were just about road legal at the start of the day but they’re finished now - measuring 0.6mm on the inside shoulders as of this morning. Ooops! I bought them part worn just over a year ago so they’ve done a few thousand miles and a good few trackdays, so can’t grumble really.
To try and even up grip levels a bit I added a couple of clicks of stiffness at the front and only one click at the back. This would hopefully make the whole car stiffer through the quicker stuff but make the rear relatively softer to add a bit of traction. This worked a reasonable amount and made the car feel a bit safer for the rest of the day, but still the car wasn’t at its best around Blyton. I think adding another click at the front would have helped further in hindsight.
Despite being off my ultimate pace (about 3 sec slower per lap from what I can tell on the footage I’ve got), the car felt FAST at certain points, certainly quicker than it’s ever been on acceleration and coming into braking zones. The oversteer and pointy front end made the car a lot of fun, and made for very enjoyable laps even if not very tidy.
In the final session of the day I had a bit of an issue. I was driving a couple of laps in front a friend in his sprint prepped Octavia (absolute weapon btw!) and after letting him past and hoping to follow for a few laps, he had a bit of a mistake going into the ~95mph Port Froid and he clipped one of the white marker bails. This flicked up in the air just as I committed to the first part of the sequence which left me a split second choice to either continue with the turn and hope the bail bounced off-track, or take to the escape road. I went for the escape road which was guarded by some floppy cones. Doh!
The cones are spaced annoyingly just narrower than the width of an Exige, so by trying to fit through the gap I actually hit two of them… One straight on the front quarter of the clam and the other I just clipped with my OS arch (where the stonechip PPF is). In hindsight I should have just aimed for one right in the middle I think, let the numberplate take the pain but then the vulnerable grill would be in the firing line… tough one to call!
https://www.youtube.com/watch?v=TU8d1qeMToo
Initially the damage looked pretty bad, the black is just rubber transfer from the cone but the paint looked very scuffed too. Luckily this proved not to be the case, it was just smears of cement dust from a few fluid spills earlier in the day.
This really didn’t spoil the day, we’d had some brilliant laps despite a fair bit of traffic and had learned a few more important lessons about the car and my new additions to it. No reliability issues and didn’t even need to open my toolbox, so that can only be a success!
I drove home grinning like a fool, almost wearing my battle scar like a badge of honor. My worst case scenario was that I’d get the front end in for paint over winter, I’ve picked up a few stonechips anyway and have evidence of at least one pheasant strike so would have been a nice treat.
As it happens though, I cleaned the car this morning and all of the ‘damage’ simply wiped off with the aid of some tar remover. Didn’t even need to do any buffing. Result!
The PPF marks are harder to lift, I don’t know what Lotus used back in 2006 but it’s bloody awful for cleaning. I have the same issue with rubber oil stains after a trackday, they wipe off the paint work with barely any effort but require hours of work to get off the PPF. Seriously considering ripping it off and just submitting to our stonechip overlords.
As for next steps, nothing booked now for a month or so - so will revert the dampers back to road settings and get some rear ZZRs ordered. I think my next trackday will be Blyton again (yeh yeh I know, ZZzzZzz but it seems like the only dates I have available are Blyton days at the moment and I’ve got store credit to spend!) so I’ll pick up where I left off at 8/7 from hard and move to 7/7 if the rear is still a bit loose on the fresh rubber.
It might be worth adding ( a bit late now? ) ambient temp and tyre pressures to your chart?
Fantastic writeup and on the hunt now for another trackday ![]()
Yes probably a good addition, I do generally keep my temps at 30psi all round on trackdays (and just keep dropping them after each session to keep them in check) as per Avon recommendations. I have had a couple of people suggest dropping to mid 20’s though despite that advice, so might explore that next time out.
My GoPro started failing me at Croft, it could just be the memory card but I lost a couple of sessions due to corrupt files. At Blyton I lost most of the day it seems, in some cases a file would contain half a lap, then blank, then come back in for a couple of laps - etc. Very random. I’ll add a new SD card to the shopping list ![]() I don’t think I missed any amazing footage though, though it would have been fun to come up with an ‘oversteer’ compilation. I found one good clip of Bishops, by the end of the day I was entering it at 60mph and with moderate throttle on the apex my inside rear was spinning up. Looking at a clip from 2019 I was entering at 70mph and was on the power pretty much immediately without a hint of slip!
I don’t think I missed any amazing footage though, though it would have been fun to come up with an ‘oversteer’ compilation. I found one good clip of Bishops, by the end of the day I was entering it at 60mph and with moderate throttle on the apex my inside rear was spinning up. Looking at a clip from 2019 I was entering at 70mph and was on the power pretty much immediately without a hint of slip!
Perhaps I’ve gained more midrange torque from the charge cooler/exhaust combo than I’ve given credit for and it’s overwhelming the rear a bit more - but the tyres are definitely shot so I’ll just deal with that for now!
I’ve had a slight gremlin recently which I don’t think I recorded yet in the thread. Mainly because it was very infrequent and would only raise its head every few weeks (or even months) so didn’t spend much time thinking about it, but the car seems to have an issue where periodically the engine will stall when cruising to a stop either in neutral or in gear with the clutch depressed. It seems to happen more often when the car is (very) warm and it seems to be ramping up in frequency over the last few weeks but that could be a fluke.
There’s loads of info about this problem from the mid-00’s with people going in for warranty claims for this and from what I can gather it was resolved by a reflash to later code on the ECU. Some months ago there was a slight suspicion that my car may have a 255 map on it (based on ambiguous part numbers and a throttle % opening readout from ODBII) and further reading suggests that the 255 map also had some gremlins with stalling at low speeds (which dealers subsequently resolved by sticking the 260 map on…)
Mechanically I guess an air leak could cause this, there is a Lotus TSB floating around suggesting pinched o-rings on the SC outlet adaptor (swan neck thing) could leak air but I’d expect CEL’s and running issues if that was the case. Car pulls like a train so that seems unlikely, but I’ll get some soapy water sprayed around to see what I can see.
I’ll not invest too much time into this as I’m fairly certain I’ll be going in for an EMU install soon - just finalising plans/details but it’s worth logging just for the sake of continuity in the thread.
Back to the exciting topic of HVAC now that the trackday flurry is done with. Sorry wall of text inc.
As a reminder I’ve got an issue whereby my heater blend door will randomly move to the ‘heat’ position whilst I’m trying to enjoy the icy blast of working AC. It seems to be electrical but the root cause is still unknown, the flap isn’t sticky - it’s actively moving back to the heat position whilst the knob is set to cool.
After many research, I have a three phase plan which I’ve been working on in the odd late night garage session recently.
Phase1: Update the AC Thermostat
I don’t believe this to be a contributing factor to my issues but apparently the early S2 cars have an issue with the old analogue temp probe that’s used in the AC evap unit to prevent freezing. In effect it only flags for the AC unit to dip the clutch after the system has already frozen, so in certain (humid) conditions you can end up with your AC switching itself off every 20mins or so whilst it waits to thaw itself out. :lol: The fix for this came in around 2007/08 (I think?) and came in the form of a drop-in replacement for the thermostat unit.
The replacement is a digital unit, so required power - but I guess feeds back more granular information to the car to allow the AC to by cycled on/off more precisely and avoid that freezing over. Had I known about this relatively cheap and easy update back when I had the HVAC system on my bench I would have course done it then - but it’s something I only learned about quite recently
I want to do this update for two reasons,
1- It replaces part of the wiring for the heater blend flap, so allows me to rule out a small link in the chain from being my problem
2- Once I implement Phase 3, any hope of having enough access to do it will be gone due to the extra gubbins I’ll be adding so now is the time.
Phase2: Identify the root cause of my issue, or try.
Some of my options for Phase3 rely on the potentiometer control knob and wiring to be sound for them to be of value - so I need to rule them out as a potential problem. Even if the issue can’t be easily fixed with the clam on, I just need to know what link in the chain is causing problems so it can be bypassed.
My hope is that the actuator itself is at fault (loose connection inside or something), it can’t be swapped with the clam in place but I’ve got a spare for when that happens and it means I can leverage the rest of the wiring for Phase3.
Phase3: Implement a heater matrix bypass mod
Even if I find and fix the problem as part of Phase2, my research has led me to a solution which would improve even a fully working HVAC system. In short (as I’ve documented this at length elsewhere) the heater matrix in this car is always “active”, so even when demanding cold air the system eventually heatsoaks and the potency of the AC gradually declines on longer trips. The solution here is to add a bypass valve in front of the heater matrix which can be controlled by one of a few different ways:
1- Use the factory temperature knob, but relies on this not being my problem in Phase2
2- Implement a new temperature knob and make it look as OEM as possible
3- Hide a rocker switch somewhere and have the bypass be independently controlled of the temperature knob.
Those are roughly listed in order of preference, but there’s no point in going for option #1 if my temp knob is the root of all my issues anyway!!
If implemented, this would boost the effectiveness of the stock system but also to a certain extent would make my heater flap redundant - so if my root issue cannot be solved, I can at least have cooling and heating on demand.
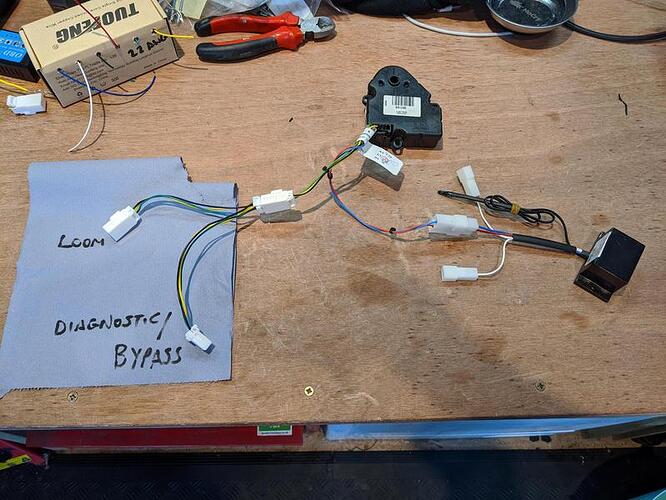
Moving onto progress, I took delivery of the thermostat update kit a couple of weeks ago. This included a small wiring harness that would replace the power to the heater flap, as the new digital thermostat requires a power feed from it.
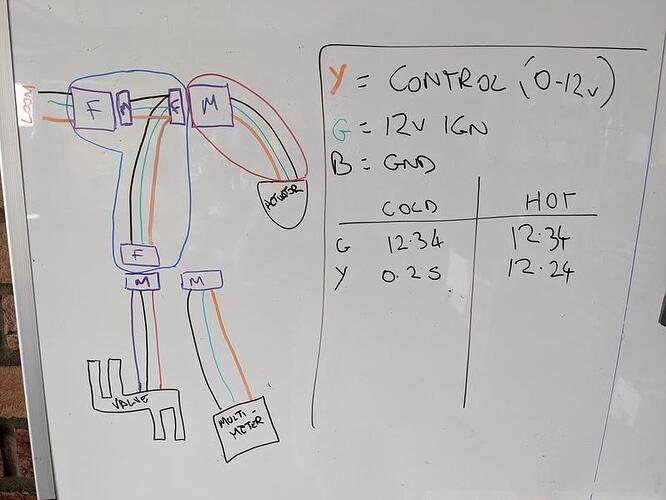
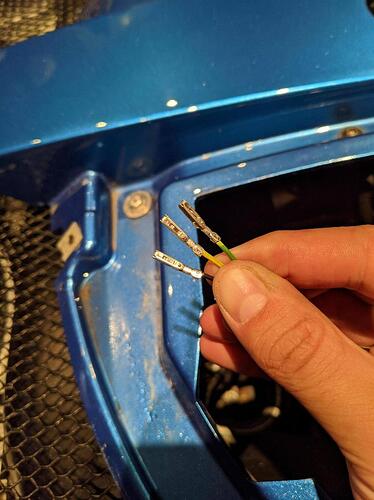
I also bought a bunch of plugs, pins and 22AWG wire so that I could make up a Y-adaptor for it. This will serve a dual purpose, first it will allow me to run a “troubleshooting” lead to the cockpit where I can hook up a multimeter and try to catch the heater flap red handed. Based on previous baseline readings from a a multimeter I know that the yellow control wire should be showing approx. 0.25V in the full cold position and the full 14.XV in the full hot position, with a linear scaling inbetween.
(stuff circled in blue is new stuff I’ve made/crimped, stuff circled in red was replaced by the thermostat kit)
If/when my flap next fails, I can check out the multimeter on my passenger seat and if the control voltage drops to zero or incorrectly spikes up to 14V then I know there’s an issue in the wiring or control knob somewhere. If the voltage remains at 0.25V then I know the issue is with the actuator itself.
The second purpose for it is that I can use this as a control connection from the bypass valve once I fit it. I found a bypass kit intended for classic car retrofits that takes a 0-12V control wire feed so should work with the factory heater knob.
Since I was replacing a bunch of connectors, I chopped off the loom connector too in the car and re-pinned that in a fresh plug. The pins had small amounts of corrosion on them but nothing I’d expect to cause issues. Still, another link in the chain ruled out.
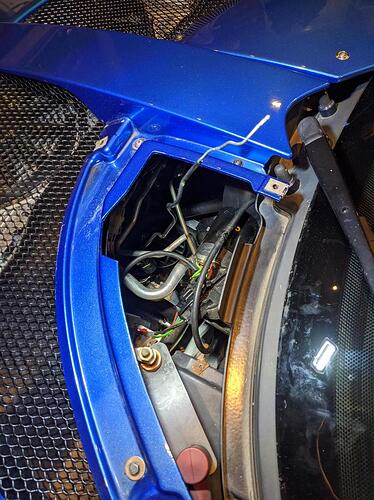
My next job was to install the new thermostat kit. The Lotus instructions claim that this is simply not possible on an Exige with the clam in place (Elise is doable just about), but based on my experience inside the front maintenance hatch I begged to differ - so took the job on anyway.
All that you need to do is retrieve the old temp probe from the HVAC box, it enters through a rubber grommet and just pulls out:
The new unit comes with a rivet and a 3M sticky pad, I intend to stick mine to the bulkhead as there’s plenty of room down there. For now I just lobbed it in, then attached the wiring to the actuator (probably the hardest part of doing it with the clam on) and then connected the thermostat back to the factory wiring. The new temp probe threads in through the same grommet, then is cable tied to a bracket and is poked into the fins of the evaporator. It was pretty easy really, you can either be looking at what you need to do, or be doing it - you can’t do both at once so it’s lots of fiddling around blind, retrieving your hands and then planning your next move, repeat etc - but all doable.
I’m not too happy with the wiring though, it’s all sort of lobbed in and this place is subject to occasional rain water/car wash water. I think I’ll retrieve all my new plugs and just grease them up a bit and wrap the lot in bubble wrap or something just to keep the worst off.
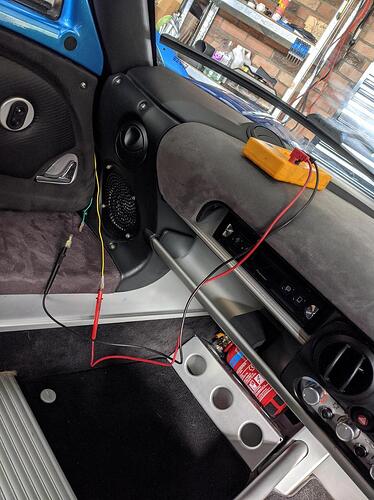
With my new Y-Harness in place, I could then attach a 4-foot “diagnostics lead” that I made up and run that to the cockpit.
So now I can see in real time what the actual heater knob and wiring is up to. Happy days!
I’ve done a quick test run in the garage, and the AC is working a treat with the new thermostat in, but of course the heater flap is behaving so far so haven’t been able to test out my rig!
https://www.youtube.com/watch?v=cNdtbxUWAxM
This is all interesting useful stuff!
I think I’ve got my first lead thanks to the test rig!
I’ve not been out in the car yet (rain!) but noticed when I was fidgeting around in the cockpit that if I banged the dashboard the multimeter report from the control wire would fluxuate…
I took this a bit further by popping the control panel off and then gave the wires at the back of the potentiometer a wiggle… et voila.
<LINK_TEXT text=“https://www.youtube.com/watch?v=Q23jw-Z … e=youtu.be”>https://www.youtube.com/watch?v=Q23jw-ZDjSs&feature=youtu.be</LINK_TEXT>
I’m pretty sure the voltage shouldn’t be fluctuating so much like that. If I stick my phone into the access panel you can see the flap moving too.
https://youtu.be/fQrQc1_seAU?t=32
(this is the flap moving from cold to heat as the wire is fniggled)
This feels like a bit of a slam dunk here. Trying hard to not get excited!
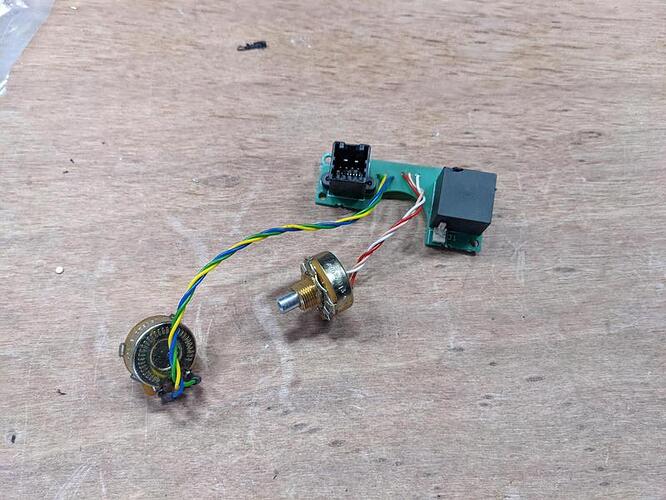
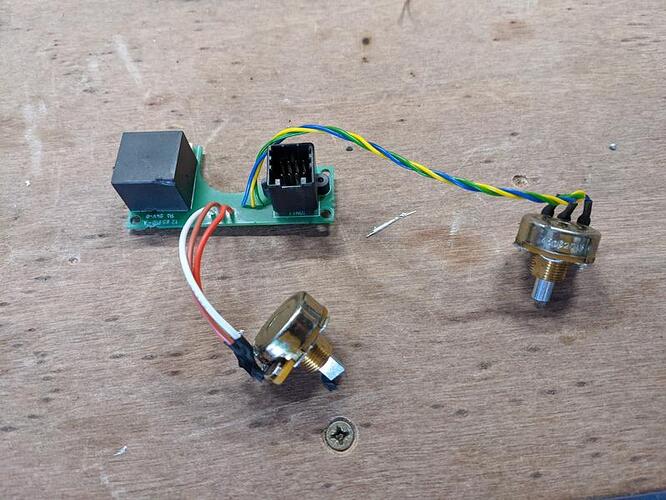
I’ve taken the potentiometer knob out of the dash (along with the blower position one that it’s soldered to) and got it on the bench.
There’s a spare heater control panel on eBay currently so that’s an option, but it’s old and used and I’ve got no guarantees on it I guess. I imagine the potentiometers are available somewhere for pennies, but so far Google-fu is letting me down on the stamped part number - so more work needed before I can put a fix in.
It may just be the short length of wiring, or the quality of the solder to the board - so removing and refitting might be all it takes but if I can source a new knob I might aswell swap the lot out.
Exciting! (And I’m being serious here). Well done ![]()
Good work ![]()
Does look like just a bad connection/fractured wire from the video. You should be able to test the pot. is still working in isolation with the meter on the resistance setting. I reckon soldering a new length of wire on will be job = carrot ![]()
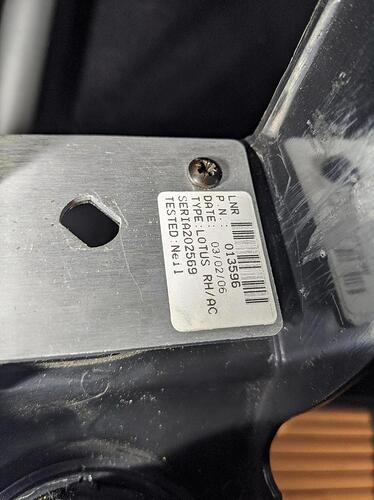
What are the numbers on the pot?
Pot testing:
a) Check span resistance (usually the two end contacts)
b) Put DVM on one end and middle, rotate pot and note if reading changes smoothly or not (NB. Pot may be linear or log, so don’t be thrown if mid-travel isn’t half the span)
c) Put DVM on other end and middle, repeat above
Pot tracks can be really bad for getting dirty. A good end-to-end wiggle might help, plus spray with contact cleaner (solvent-type only, usually IPA, not the oily stuff…)
Get a magnifying glass and check all the soldered joints on the pcb. We get bad/dry joints that look fine on a couple of lab meters we work on often, it’s only with a lens that the fault is visible.
Cheers for the input team. Due to the nature of the ‘wiggling’ I do suspect the wires or the soldered connections rather than the pot itself - but who knows. I expected the pot to be a cheap and easily sourced part so I’d throw a new one in “just because” but I’m struggling to track down the part number.(45052013 0549) (Zero’s could be o’s and 5’s could be S’s tbh - hard to read)
Before I started on this journey the first thing I did was check resistance across the contacts on the pot, which came back as expected but of course it’s very hard to measure this whilst manipulating the wires etc. I’ve just about managed to balance my multimeter probes against the contacts on the PCB whilst wiggling the wire and can see the same sort of variations in resistance as to what I see in voltage on the actual loom - so the pieces are all adding up.
I’ve given the inside of the pot a good blast out with contact cleaner just to cover all bases.
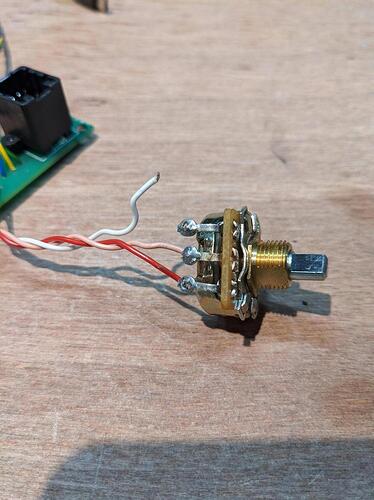
As for inspecting the solder joins… well, fingers crossed I’ve found it already. No magnifying glass required:
disclaimer there’s half a chance that I broke that join myself whilst stripping off the heatshrink… but I’m kinda sure it was already loose inside there. The others are secure and snug but this one just fell straight out as soon as I stripped back the heatshrink.
Hopefully this is now a quick fix, solder in three new wires tomorrow with some fresh heatshrink and then try again with the wiggle test.
If anyone knows Neil at Lotus I wouldn’t mind a chat about the thoroughness of his testing.
I have just chuckled at the Neil @ Lotus comment
… and this is why so many motorsport and other high-stress connections are crimped, not soldered ![]()
Bit of progress today.
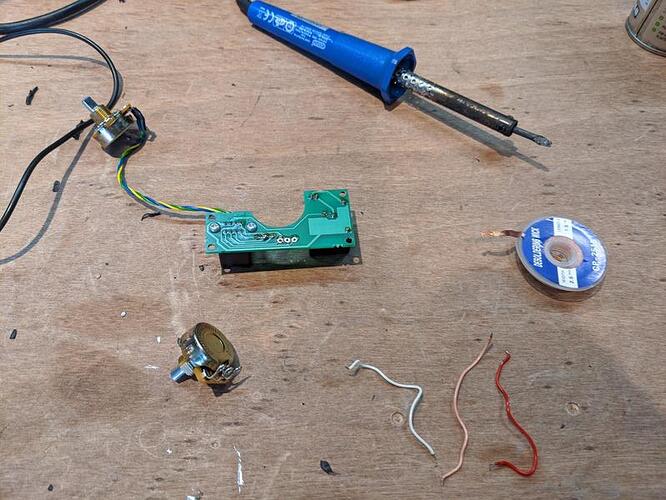
Sucked the old solder out first and removed the wires.
Pretty sure the wires are OK, but I’ve got some of the same gauge (but no pink, so brown will have to do ![]() ) so figured I’d swap it out anyway.
) so figured I’d swap it out anyway.
Re-soldered t’other end and got some new heatshrink on and we’re ready for testing.
The verdict… I can no longer get the voltage to fluctuate when manipulating the new wires or the centre control panel, it sits rock steady at 0.22V (a bit lower than before, so maybe my wire is a different gauge after all
Needs a good road test before I declare success, but for now the signs are looking good. Will get the front of the car put back together then find an excuse to go for an icy cold drive. ![]()
I wonder what I am going to be checking this weekend …


