Heater Matrix Bypass

Anyone that’s read ‘my’ thread will know that I’ve experienced a bit of an inconsistent flap recently, my AC works great -blows icy cold but occasionally the electric actuator for the heat/cool blend door in the heater box decides to move to the ‘heat’ position, meaning my AC chilled air is routed through a red hot heater matrix before meeting my sweaty face.

The fix for this is probably to change the actuator, it seems like it’s on the blink - but that’s (another) clam off job, draining the AC system, removing a load of AC parts (that are highly likely to break when being unscrewed, ask me how I know) and frankly the problem I have is not frequent or annoying enough for me to go to those lengths unless I have a different additional excuse to remove the front clam.

My research on the matter brought to my attention a modification that seems popular in the warmer US States in which a bypass valve is fitted before the heater matrix so that you can actually switch the heater matrix ‘off’, that way regardless of what the blend door flap is doing you can still get cold air through the system.

I’m going to start collecting bits/research and look at doing this to mine - it can be done ‘from above’ and so will be an interim solution to my glitchy flap but even with a fully functional flap this should be considered an upgrade as you can stop the heater box from heatsoaking in summer, degrading the performance of AC and the cold air blowers.

I’ll document it in this thread, both to help other people who may not read my Owners Car thread but also in the hope that it attracts the attention of people who have already done it!

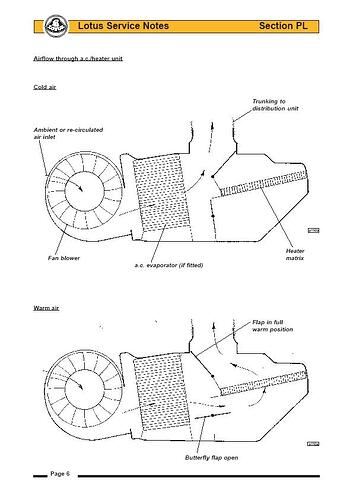
First up, this is how the system is supposed to work.

You can see that the air from the blower always blows through the AC evap unit, and is then either directed straight up to the vents, or via a back door through the heater matrix depending on the position of the blend flap(s). The heater matrix of the Elise/Exige platform ALWAYS has hot water flowing through it, which is what this modification aims to fix, by starving it of hot water, even if the flap was stuck in the lower heat position, the air should still be nice and cool.

The heater matrix cannot be simply blanked off completely as the Toyota engined cars have a feature in which water continues to circulate round after the car is powered off to avoid hot spot damage so whatever solution is used should default the system to “non-bypassed” when the car is switched off.

The first published implementation of this is documented at length here: Heater Core Bypass Mod (Tony Wa) [How To] | The Lotus Cars Community

In short, it takes a vacuum feed from the brake booster to deal with the “should only bypass when car is on” requirement, then uses a rocker switch to the cabin to allow the occupants to switch the bypass on or off independently of the original temp dial potentiometer.

That solution is fine, in fact it’s brilliant - but the addition of the extra switch is something I’d like to avoid if viable. It seems like somebody else has investigated that (Electronic Switch for Heater Core Bypass Mod | The Lotus Cars Community) and has essentially converted the variable resistance signal from the potentiometer dial to a binary “hot/cold” signal. This means that no extra switch is needed, and when the dial is set to ‘full cold’ the bypass kicks in, when set to anything else - the bypass is removed. I really like this approach, but by far my weakest area is electronics so I may struggle to get my head around it (alone!).

My plan is to start collecting parts and setup a test rig on my bench, should be easy enough to simulate with some buckets of water, a power source and a potentiometer (can cobble together a long extension lead to the car if needed and use the one in the dashboard).

Once this is done, my hope is that I can have got or cold air regardless of my flap issue. I would potentially disconnect the electrics from my flap and leave it in the ‘warm’ position, then use the bypass exclusively for controlling heat. Obviously I won’t get granular control like this, and I expect the turnaround between heat and cool will be quite slow as the residual temperature in the matrix would need time to drop - but it would work, and once the flap/actuator is returned to service (whenever that is) I will end up with a system that’s a fair lick better than the factory effort.

Welcome any encouragement, experience or thoughts.
I can help you in the ‘encouragement’ department - it sounds like a great fix for the super-annoying sticky-flap problem! Mine moves a bit, sometimes, but normally not - I plan to fix it one day, but if it’s possible to do something better (which this is) then it’d be amazing to have this documented for the future! Top marks to you for trying! :slight_smile:

This could be interesting! I am having the issues you are trying to overcome.

My only thought is that are Lotus using the matrix as a passive cooler? Just another way to cool the cars engine?

I guess it doesnt matter too much as most of us have better radiators in now …

Yeah the heater matrix will be dispersing some heat from the coolant circuit, whether it’s measurable or not - who knows. It’s just something I’d need to test/monitor. Like the good old days of motoring where you had to switch your blowers on pronto to stop your engine from blowing up on the way home :laughing:

I think a passive benefit of this would also be that non-AC cars would be significantly more comfortable to drive in. Even ambient temp in a 25+ day like we’re having this week can pleasantly cool you down when it’s blasting your face at speed. With the factory heater matrix setup you’re rarely/never going to get ambient though as the matrix is constantly heat soaking the heater box even when the flap is working correctly.

Would be good for track use too, I try to keep my AC off on track as I’m convinced the compressor will implode after extended use at 8500 rpm :laughing:

Mine went bang at 4000rpm :slight_smile:

Makes a right noise and smell!

Will be following with interest!

What do you mean, ‘the good old days’? Standard practice in an S1 to whack the heater on full when sat in traffic :blush: :laughing:

Sounds like a cool (no pun intended) mod, following with interest :thumbup:

:mrgreen:

I believe the S1 has/have got a mechanical linkage/cable between the temp knob and the flap - there are bypass valves available (I think Caterham make/supply them for their kits) which can be utilised in a similar way. With the S2 I’m stuck with electronic trickery to achieve it.

It looks like I need to tackle this in two phases, the initial install of the valve doesn’t really change at all whether I do a manual rocker switch or try to take the signal from the potentiometer knob - so I might as well gather the parts for that now and crack on. My confident levels of achieving the manual switched level of functionality is around 95%.

To tackle the potentiometer option looks a little more difficult, the thread on Lotus Talk is old and the two contributors who look to have achieved this haven’t been active since 2013. The OP lists part numbers, but all seem to be US distributed parts only - so even though the whole project is doable for ~ $70, it seems I’ll need to read through data sheets and try to find modern/UK based equivalent components which may/will expose my lack of knowledge in this field. I reckon I’m at 30% confidence levels right now of getting the potentiometer bit working. :smiley:

(UK) Parts list so far:

Main Mod:
Heater Valve

Vacuum Switch

<various clamps, wires, etc - more detail to come>

Potentiometer Mod:
TDE1798 Single Chip Integrated Circuit

Chip Socket (Optional)

Prototyping Board

Enclosure

<Various Wires/Resistors/etc - more detail to come>

Alternative all-in-one:
All in one pump/rotary switch that uses same voltage range as the OEM switch

The compressor turns off on full throttle on the Toyota cars - at a Hethel day some years ago, Matt Becker told me he had the AC on around the track, so there was cold air in the braking zones, and its switches off on the straights and out of corners…

Also following with interest, as although I don’t get the issue you have, I do seem to have a sticky flap (oooerr) so never put the dial to fully cold or fully hot in case it gets stuck…

That’s good to know, still not gonna risk it though :laughing:

I had another thought about my plan of action, I still don’t technically know for sure that my flap actuator is the faulty part - it may also be somewhere upstream in the wiring loom I guess. It’s pointless me investing a lot of time/effort figuring out the potentiometer option if the signal isn’t going to get to the new bypass valve anyway, so I’m going to order a new actuator to at least rule that out. I can hook it up without the clam on (just not attached to the flap) and test the arse out of it to make sure it responds as expected to the twirly knob on the dash. I can then stick it on a shelf for if/when the clam next comes off anyway.

Just come across a slight variation of the potentiometer approach, which is to replace the ‘heat’ knob all together for a different switch that has an ‘on/off’ feature in addition to the sliding scale - so for example a knob that pushes in and out as well as spinning round, or if rotated all the way round to cold it “clicks off” like some Hifi volume knobs.

More to investigate :nerd:

After LOTS of reading over the last couple of days I’ve essentially discovered that the heater matrix bypass mod has evolved over several iterations, each getting gradually ‘slicker’ in terms of making the install as OEM as possible. The original concept was documented way back in 2006 when my car had new car smell in it, but that original author has since moved on from Lotus ownership and then the forums, as did his successor but the latest iteration of the mod still has an active forum contributor - maybe I can coax him over here one day…

The evolution of the mod has changed the ‘activation method’ over time, but the basics of the bypass pump and vacuum switch have never changed.

Rev 1. Had a manual rocker switch added to the cabin somewhere, this worked independently of the temperature knob on the dash so if you wanted cool air (assuming your flap functions) you would set the dial to cold, and click the rocker switch ‘on’. If you wanted heat, you moved the dial to warm and the rocker to off, etc. Functional but a bit clunky and clearly a modification.

Rev 2. Had the in-dash potentiometer knob replaced with a similar model which included a clicked ‘off’ setting when span to the far anti-clockwise (cold) direction, similar to a volume/power combination knob on a radio. Alternatives had a knob that could be pushed in/out to activate/deactivate the bypass. This looked OEM, but still required an extra activity to kick in the bypass.

Rev 3. Seems the most complex, but was the first truly ‘seemless’ integration. A chip and series of resistors was installed to trigger the bypass when the voltage on the circuit dipped below 1v (indicating the knob was on the cold end). This would be totally transparent to the “user”, as the bypass initiates automatically when the OEM knob is set to full cold.

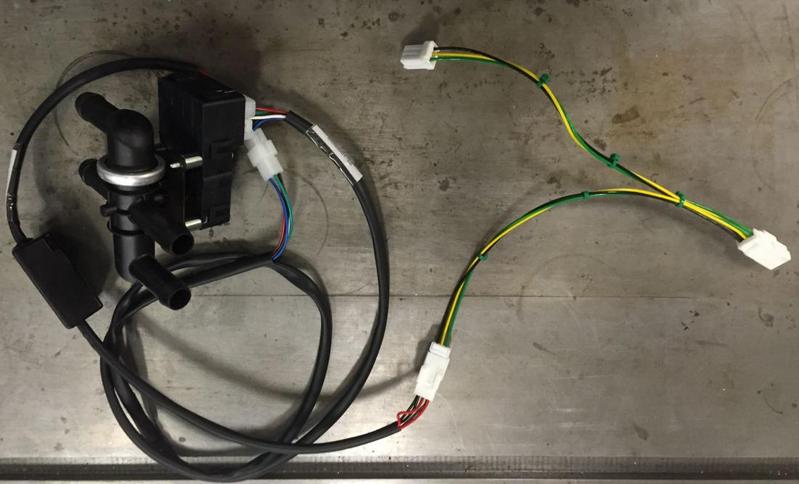
Rev 4. Seems to be the gold mine, it’s basically Rev 3. except all of the hard work is done for you by this setup: eBay Link to bypass pump. This setup is already configured for a potentiometer feed with a range of 0-12V, exactly the same range as the rotary switch in the car. This means the supplied knob can be lopped off and the wiring can simply be spliced into the OEM loom for the heater blend door/flap. It means no wiring run to the interior of the car, totally OEM user experience and also totally reversible as the lotus connectors can be sourced and turned into a ‘piggy back’ lead from the actuator.

The Author/creator of Rev 4. is still around, so hopefully if he doesn’t mind I can get some hand holding to obtain the appropriate parts in the UK. It probably works out the most expensive option due to the bundled nature of the pump/switch but that may be well worth it for the simplicity.

Next steps I need to rule out my potentiometer and wiring as being a potential source of my original problem. If a fault exists there, then implementing this will all be for nowt’. The good news though is that a fault with my wiring or potentiometer is resolvable without taking the clam off and the AC system apart, so I’ve actually got my fingers crossed that the issue is somewhere upstream of the actuator…

I am all over this ( well , waiting for you to experiment ) but happy to lend some soldering / hands / advice / maths / tea making if needed.

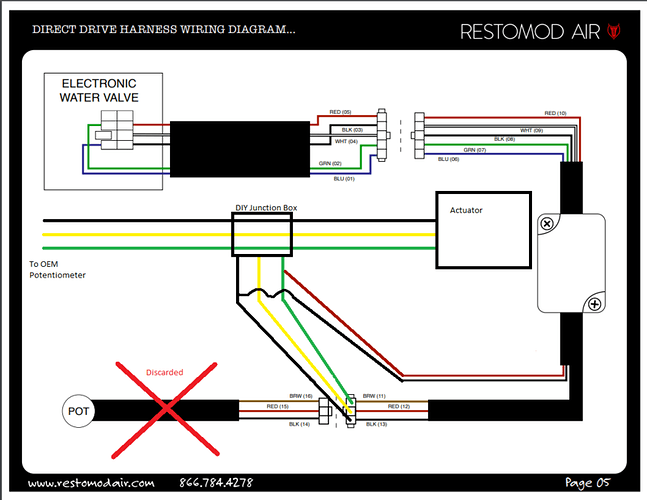
I’ve done a bit more homework on revision 4, just putting some effort in to figuring out the electrics.

I got hold of a basic wiring diagram from restomodair.com, then from cross referencing a photo of somebody else’s install in a Lotus I cobbled together a final wiring diagram.

The black/green/yellow is the Lotus loom and goes back to the HVAC panel in the dashboard (green I believe is IGN live, yellow is the control wire and black is ground - based on the photo below (probably should be checked before I finalised anything)

The benefits of this setup are obvious, the Lotus connectors are readily available so as in the photo above a small Y patch lead can be made up to allow this to all be plug and play. Additionally control of the bypass is granular with this setup (all others are fully on, or fully off) which means you can bleed a small bit of coolant through to just take the edge off of the AC on a mild day! Pretty much rolls royce functionality.

HOWEVER… there’s one glaring omission from this setup which is a key part of all other revisions… there’s no interaction with the vacuum system on the car.

The vacuum switch in other designs is intended to activate the bypass only when the engine in running, so once you shut off, vacuum drops and the bypass is disabled allowing the Lotus/Toyota heat soak pump to circulate everything properly. From what I understand of revision 4, this functionality is effectively removed… the heat soak pump will still work obviously, but it will not circulate through the heater matrix if you turned the car off in the ‘cold’ position. I’ve got no idea how critical this is or is not, I know there are many cars out there running aftermarket ECUs which don’t even support the heat soak pump functionality (though some aftermarket ECUs do) - just how critical is the heat soak pump, and just how critical is the heater matrix in that functionality?

That’s probably my next thing to research, if I’m not 100% happy I think I’ll revert back to Rev 3. using a ‘switched’ potentiometer in place of the OEM one.

Found this quote regarding the heat soak pump:

The pump functions only with ignition off in conditions where the ECU remains live. The pump is then activated at coolant temperatures over 110°C, switching off at 100°C on fall. If temperature should rise to 115°C, the pump will be supplemented by the two cooling fans running at half speed, switching off at 110°C on fall.

The heat soak pump exists only in the heater circuit, so the heater matrix is essentially the only radiator available to help bring these temps down before it deactivates. I’ve never seen coolant temperatures in my car go over 93 degrees, so it seems like a bit of a push for them to get to the 110 degrees needed for this pump to function… unless of course the engine is significantly heat soaking after I power off and walk away (I doubt it? My water temps always seem to drop significantly when I do short stops for fuel etc).

Hmmmm.

Are you sure on the wiring colour? Green is normally power , yellow is switched live ( ignition ) and black negative …

It’s based entirely on that photo which somebody else took after doing this job, and yes I was surprised as switched IGN is normally yellow. Next time I have the access panel open I shall be testing, hopefully should be able to see the resistance range of the potentiometer too to make sure that’s working OK and is not the source of my flap issue…

Found another quote to back up the odd wiring colours:

If the flap doesn’t move, check the 12v power to the actuator. The yellow wire to the actuator is the control line, it should be 0-5V depending on the temperature setting.

So Yellow = Control, Green = IGN.

I took delivery of a spare actuator today, was a new old stock one lurking on eBay so snaffled it. Still not 100% sure mine is faulty, but I can at least use this one for testing.

RIght I’ve spoken with a few people, readjusted my perspective a bit and I’m now pretty happy to proceed with Rev 4. despite this approach not having a mechanism to keep the bypass disabled when the car is powered off.

I had been thinking that by having the matrix bypassed with the car powered off would totally negate the value of the Lotus implemented heat soak pump to protect the engine from hot spots. That’s not true though as the water is still able to move around the full circuit, just skipping out the small matrix unit itself. The heat soak pump is not intended to cool the coolant as such, just to keep it moving whilst it naturally cools off in a stationary system. Some early posts I read suggested bypassing the ENTIRE heating circuit by installing a kit in the engine bay where access is easier, but this would negate the value of the heat soak pump and so is not a great idea.

So I’m pretty committed now and will start buying parts this weekend, but there’s a few things I want to do first:

1 - Find out what my actual issue is, even if it can’t be fixed yet. If my actuator is dead/dying then I can render it redundant through this bypass and come back to fix it later if I can be bothered. If the wiring to it is damaged, or the signal from the dash controls are damaged then I’ve got a problem as the new solution won’t work either!

2- Any limited access I have to the heater box currently will be completely removed once I add in all of the bypass gubbins, so I’ve got an opportunity to try another upgrade first. In 2007 Lotus changed the thermostat kit on the AC system to a smarter setup which would prevent the system from freezing over in extreme conditions. The Lotus instructions for this kit suggests the clam needs to come off for this install, but based on my time spent in the access panel I beg to differ. I think it can be done, but only before I go and drop a bypass valve in there.

Honestly with the amount of time I’ve spent thinking about this I could have had my clam off twice already. What I’m most nervous about is deconstructing the AC system again out of fear of damaging more rare/expensive parts. Taking clam off will gain me SOME access, but ultimately to do all this easily and properly would need the AC dryer to come out which I’m really not keen on doing again in case it breaks!